Do you have trouble taking good iPhone photos at night? Do your night photos look grainy or blurry? Shooting in low light can be a challenge. But with a few simple tricks, you can dramatically improve your night photography on iPhone.
How to take good photos on iPhone at night or in low light
In recent years, several good camera apps with night mode have been released on the App Store. Today, you can use a number of great apps that offer a dedicated night mode, and it will help you take great iPhone photos in low light and at night.
In addition to the apps, there are other tips that include little tricks and accessories that can help you. In this tutorial, you will discover how to take night photos that you never thought possible with an iPhone.
What is MagSafe on iPhone 12 and what can it do?Download a third-party app with manual settings
The original iPhone camera app does a great job of taking night photos. But it doesn't have all the features you need for shooting in the dark.
However, you can use a third-party app with iPhone night photography settings.
Pro Camera App (R$ 49,90)
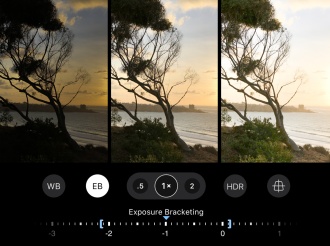
The ProCamera App has a special low light mode to take pictures rich in detail and low noise at night. While the camera's night mode as of iPhone 11 and iOS 13 is excellent, it only works with the standard wide-angle lens. ProCamera's low light mode works with all lenses on your new iPhone 11 and up.
- Download
Slow Shutter Cam (R$ 10,90)

This app was one of the first with a dedicated night mode for iPhone. It allows you to take long exposures. Plus, you can manually adjust the ISO for really rich detail and low-noise shots for still scenes.
- Download
Use iPhone 11 and above camera night mode

But if you have an iPhone 11 or higher, just use the iOS13 night mode camera with its telephoto or ultra-wide-angle lens.
It is a special mode for taking low-noise, rich-detail photos in low light and at night. The iPhone 11 will automatically activate it as soon as it detects a low-light scene you want to photograph.
Stabilize your iPhone to prevent shake

One of the most common pitfalls when it comes to low-light photography is excessive blurring, as the shutter stays open longer to accommodate limited light.
To avoid this, you can use a tripod or steady your iPhone against a solid surface (like a grid) while taking the picture. If none of these options are feasible, lean against something (a wall, lamppost, car, etc.) and hold your breath as you touch the shutter.
Try black and white photography
If you've tried everything, but you're still having a lot of trouble getting a clear, crisp photo, consider processing the photo in black and white (using the camera app's own editing tools) to emphasize the contrasting light levels (which will better define their subjects).
Persistent grain also tends to look much, much better in black and white than in color.
Flash is the last resort
Your iPhone camera has a flash. You can enable it by tapping the lightning bolt icon in the Camera app. While the flash will light up your scene to some extent, the results can be unpredictable. It is best to use it only for portraits and only when no other light source is available.
As the flash is facing forward, it will not capture a scene in particularly favorable light. If you have to flash on your iPhone, use the front flash for selfies.
As the screen is slightly larger than the camera flash, the light is diffused in a more flattering way. It fills in some of the less desirable facial features like wrinkles and blemishes.