We often need to scan some kind of document quickly and conveniently. For this, users try to turn to various third-party apps. But did you know that it is possible to scan documents on your iPhone natively? For this, you can use the Files app in iOS 13 or the Notes app in earlier versions of Apple's system. In this way, you will be able to scan a document, save the image in PDF directly to your device's memory. Below you can see our tutorial on how to scan documents on iPhone.
In addition to saving the documents on the device, this method also allows you to save the scanned documents to the cloud, to send them by e-mail later. You can also share the scanned documents on WhatsApp or in any way you like.
How to scan documents not iPhone
Method 1: Using the Notes application
Within the Notes app, there is a well-'hidden' shortcut that allows iPhone users to scan and save documents as PDFs, which can be shared later. Below you can see the step by step on how to proceed:
Step 1
Enter the ''Notes'' app and create a note by clicking on the icon at the bottom right of your iPhone screen.
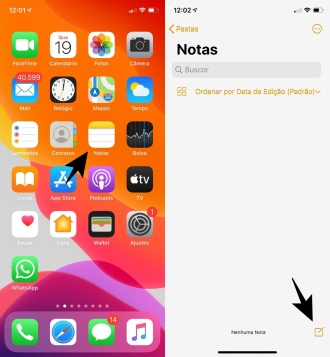
Step 2
Now look for the ''Camera'' icon (iOS 13) or the ''+'' icon (older iOS versions). Then choose the option ''Scan Documents''.

Step 3
Align the document you want to scan and press the camera shutter. Then click on the ''Save'' option. We should point out that if you want to digitize several images in a single document, keep repeating the process of taking photos and then click on the ''Save'' option.

Step 4
Okay, now that you've scanned the document, press the share icon in the upper right corner of the screen and choose the option you want. Among them, you can choose the option to create PDF or share directly to your email or WhatsApp.

Method 2: Using the Files App (iOS 13)
iOS 13 allows you to scan documents natively also through the ''Files'' app. So, you have two good options for scanning documents on your iPhone. Below, check out our step-by-step guide on how to scan documents using the ''Files'' application:
Step 1
Enter the ''Files'' app and choose the ''Explore'' option. Then click on the three dots icon in the upper right corner of the screen. Finally, choose the option ''Scan Documents''.

Step 2
Now, frame the document you want to scan. Note that the system will automatically identify the page margins. After taking the picture, you can manually frame the edges and hit "Keep Scanning". If the scan was bad, press ''Retry'' and repeat the process.

Step 3
There is a very interesting option where you can edit the scanned image. To do this, click on the image thumbnail in the lower left corner and then click on the edit icon, as shown in the image below. Finally, hit save.

Step 4
Choose where you want to save the scanned document and press ''Save'' again. There, your document is scanned and ready to be shared or emailed.

So, did you like our tutorial?