Few users have upgraded their computer's operating system from Windows 10 to 11, despite being free. Of course, it's a new operating system, and folks seem to be carrying some trauma from the upgrade from 7 to 10 (which was a disaster at the time, with many users choosing to stay on Windows 7 even after Microsoft dropped support).
According to Esben Dochy, responding to an email to Computerworld, "The main reason Windows 11 adoption rate is so low is probably the minimum requirements and a lack of urgency as Windows 10 will be supported until 2025."
you need to see
- How to Disable Windows Defender and Firewall in Windows 11
- How to install Windows 11 for free
But with each update Windows 11 gets better. I have separated here 8 secrets and tips to convince you to migrate or make life easier for a user who is already using this new operating system.
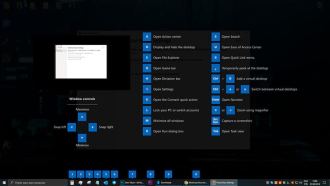
Tip 1: Snap Layout - arranging windows
Windows 10 already had the function of dividing the screen into different windows, but this tool is much more elaborate in Windows 11, check it out:
1. Leave the mouse on the maximize button of the window or press the shortcut Windows + Z;
2. Now you configure the windows you want in the available settings. A maximum of up to four different windows is possible, very useful for people with large monitors;
3. You can minimize all tabs and open them back at once by selecting the group;
4. We have some configuration options, right click on the window group and go to group settings;
5. Here in the part of multitasking You can configure aspects of this tool however you like.
Tip 2: Multiple desktops
Another feature introduced in Windows 10 was to create multiple desktops. In Windows 11 this function has been improved, follow my steps:
1. To access it, click on the button task view, here;
2. Now you can click on new workspace to create a new desktop;
3. Here we can also customize our workspaces. click with the right button and rename, here I renamed the workspaces to work, social media, video production and shopping. I also changed the background of each desktop, just right-click right button and then in choose background;
Optional: If you want, you can do as I did and add emojis to the titles, using the key combination Windows + Ç;
Now with our workspaces created, we can easily navigate between them using the key combination Ctrl + Windows e mushrooms, right and left.
Tip 3: Dragging files between windows in Windows 11
Here is perhaps the most relevant tip of all that I will present here. A lot of people have doubts about how to drag and drop files between windows and programs like we did in Windows 10. Maybe when you're reading this tutorial Microsoft has brought this utility back, but until then, while you're dragging the file, press Other + Tab to the window where you want to drop the file.
Tip 4: Themes
We can change the themes of Windows 11. The ones that come out of the box are pretty nice, in my opinion. If you're not satisfied or want something different, follow these steps:
1. Click with the right button on the desktop and go to customize;
2. Now click on themes;
3. click in search themes;
4. Here you can scroll and select the theme that you like the most;
5. Click on the theme and then on acquire;
6. Wait a while for the theme to download and then it will be available with the others, pretty cool, isn't it?
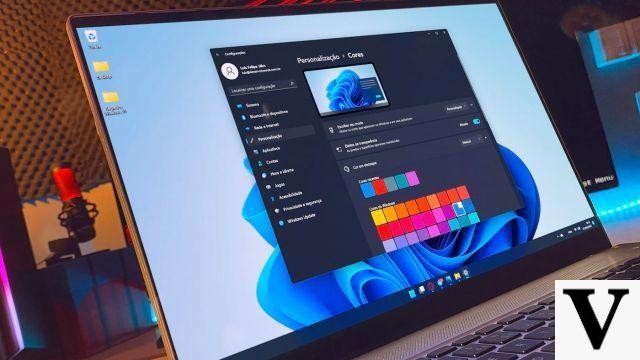
Tip 5: Dark Theme
In the customization settings, we can also activate the Windows night theme. Click on colors;
Select the Dark theme and you're done! Much better.
Tip 6: Task Manager
The task manager is extremely useful. I'm going to do a little tour of this tool that I use every day below. We can access it through the shortcut Ctrl + Shift + Esc.
If your manager is like this, press details.
Okay, now yes. Here we have all the processes that are open in Windows. It's the best way to know which ones are consuming the most computer resources. If you press memory, for example, it will list from largest to smallest process that consumes the most memory. In my case, it's the Opera Gx browser;
in the tab of performance, we have important information about your computer, such as how much you are using the processor, the frequencies, the model, how much ram memory your machine has, the storage disks connected, internet usage, video card information and / or integrated graphics, among others.
On the tab initialize, we can select which applications start with Windows (as soon as we turn on the machine). It turns out that all activated applications on this list open at the same time when you turn on the computer, resulting in crashes, especially on older machines that are still using the operating system on a hard drive. Disable programs like Spotify, Steam, Discord, etc, and you will see a significant performance gain when turning on your computer.
Editor's tip?
We have always used task manager to force shutdown apps that don't work or have stopped responding. in the tab of processes, select the application you want to close and press the From ou Delete. It always works.
Tip 7: Night Light
You may already know about the night light function on cell phones, but did you know that it also exists on Windows? It's useful for making the screen less blue and white, making all apps more yellowish, including games and movies, to make you sleepy.
1. Click with the right button on the desktop and go to display settings;
2. Click next to off to access night light settings;
3. Here we have all the necessary settings. We can choose the intensity of the blue light and also schedule it to turn on and off automatically at the time you decide;
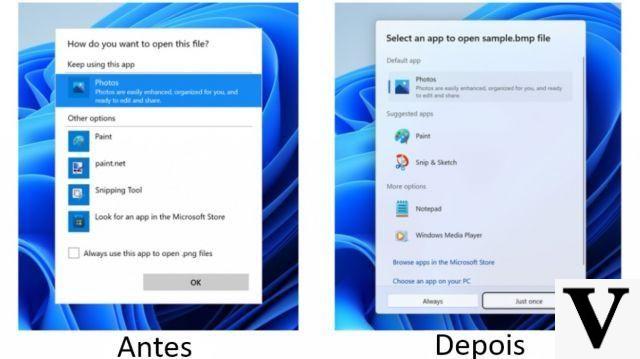
We have a very convenient tool for taking screenshot in Windows 11, I will teach you how to configure it correctly.
1. Search for capture tool and open;
2. Here it is. To take a print, press new;
3. We can activate this tool through the shortcut Windows + Shift + S, but this shortcut is pretty bad to make, so let's go Login, settings (the gear icon). then in accessibility and depois keyboard.
4. Now select Use the print screen button to open the screenshot. Ready! Now whenever you press Print Screen on the keyboard, it will go straight to the capture tool.
Editor's tip?
Instead of all that, I personally prefer to download and use the free lightshot app. It works the same way and is extremely lightweight and easy to use. Just download, install and you're all set.
Did you like the tips? Found any other hidden tools in Windows 11? Comment below and I'll include it in the post!