Table of Contents
- How to create your Twitch account
- Equipment needed to stream
- How to configure OBS Studio to stream
- creating a scene
- Notes on the Twitch Service
- Extra features for streamers
The wave of streaming on the internet has been growing exponentially and the popularity of this type of entertainment has reached its peak in the last 2 years. This was responsible for the creation of several new streaming platforms (previously led exclusively by Twitch) and millions of new streamers starting their work, making this their source of income.
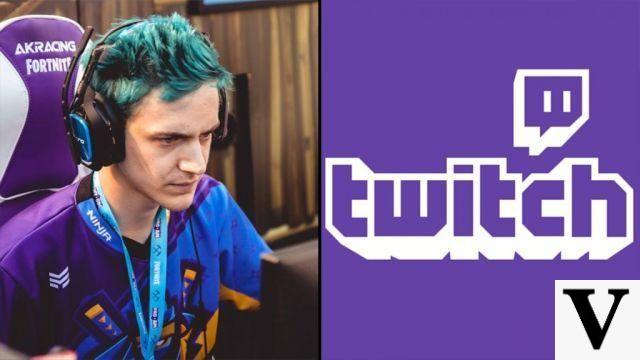
Games like Fortnite, league of legends e Counter-Strike: Global Offensive lead the popularity among users of these platforms and were responsible for turning streamers into celebrities, as is the case of “Ninja”, a streamer who has almost 15 million followers on his account on Facebook. Twitch and is known for being one of the best players in Fortnite of the present.
If you want to start streaming and don't know where to start, we'll give you the tips you need to get you started in this multi-million dollar industry.
The first step is to choose which platform you will stream on. Nowadays, as we have several options such as Twitch, Facebook Gaming, Cube TV e StreamCraft, it is up to the streamer to analyze which is the best option for you, this involves payment policy, quality of streams and popularity of that specific platform. But for this tutorial, we will perform the procedures via Twitch, since, by having a larger audience base, the beginner streamer will have more chances of their live being watched.
How to create your Twitch account
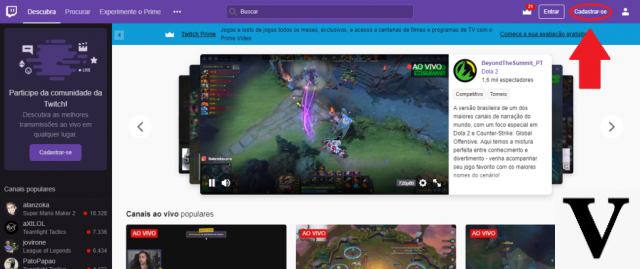
The procedure for creating a Twitch account is very simple. All you need is an email address. Go to twitch.tv and click on the user icon at the top right. Click on “language” and change the option to Spanish-Spain to make it easier. Click on “register” also at the top right and a pop-up will open on the site.
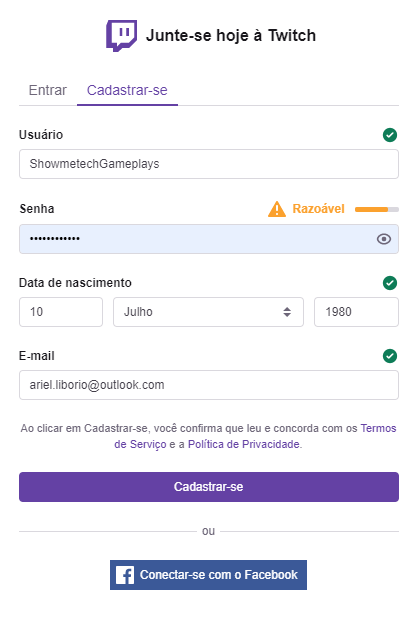
Now choose a “username”. This part is very important because this will be the name of your channel, so choose a really cool name to represent you, remembering that you can change your name de usuário after.
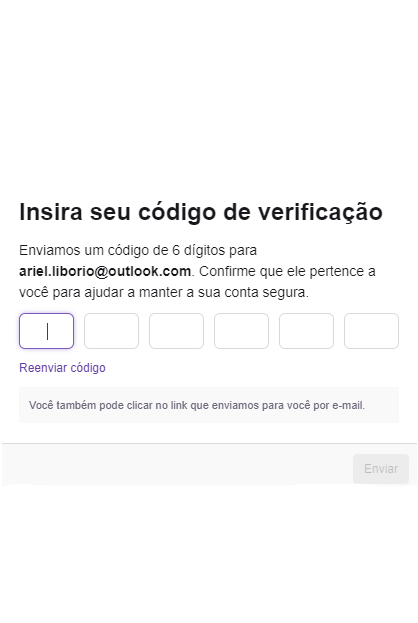
Create a strong password, enter your date of birth and a email address valid and, after that, you will be sent a verification code to your email. Enter it in the corresponding field.
That's it, your account is created and ready for you to stream. Your page address will be twitch.tv/nomedeusuário – here, for example, twitch.tv/Techlifersgameplays.
Equipment needed to stream
To perform a good stream, you need to have a broadband internet that has good data transmission quality. The recommended minimum requirement for a transmission in 720p are 5 MB upload. To check if your internet meets this requirement, visit the España Banda Larga website (metering website regulated by the Anatel) and do a speed test.

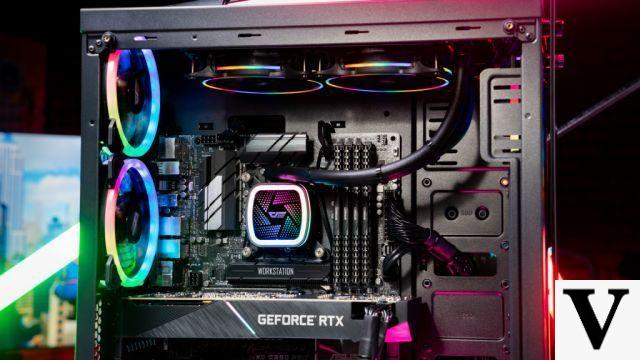
About equipment, your PC it doesn't need to be powerful to get good streaming quality. What we recommend is that he has at least 4 GB of RAM, an intermediate processor like a Intel i3 or one of the line FX da AMD and a video card of at least 2 GB memory.
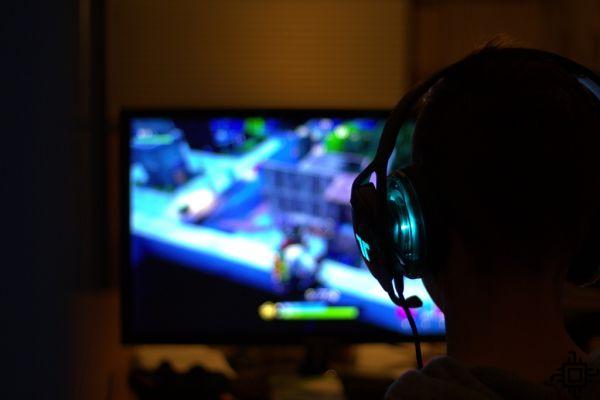
To make the stream even more interesting for your viewer, we recommend that you have a webcam in quality HD 720p and a headset with a microphone. But not having a webcam, you can only broadcast your voice, many professional streamers don't use it and they stream very well. However, the transmission of your image will make the viewer create a greater bond with you, with greater chances of staying, watching and following you.
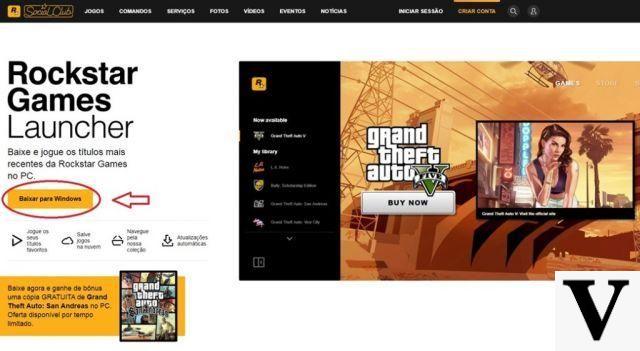
With the equipment in hand, now we have to configure the software that will send the game image to the Twitch. There are several different software on the market, from free to paid, but for this tutorial, we are going to focus on OBS Studio, one of the best streaming software on the market. In addition to having a user base ranging from beginners to professionals, it is constantly updated and the best, 100% free.
How to configure OBS Studio to stream
O OBS Studio is available for download for systems 32-bit ou 64-bit on its official website. Sign in and download the latest version.
With OBS Studio installed, let's configure it so you can stream.
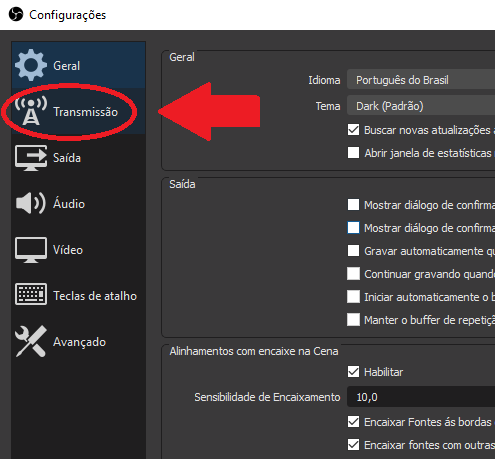
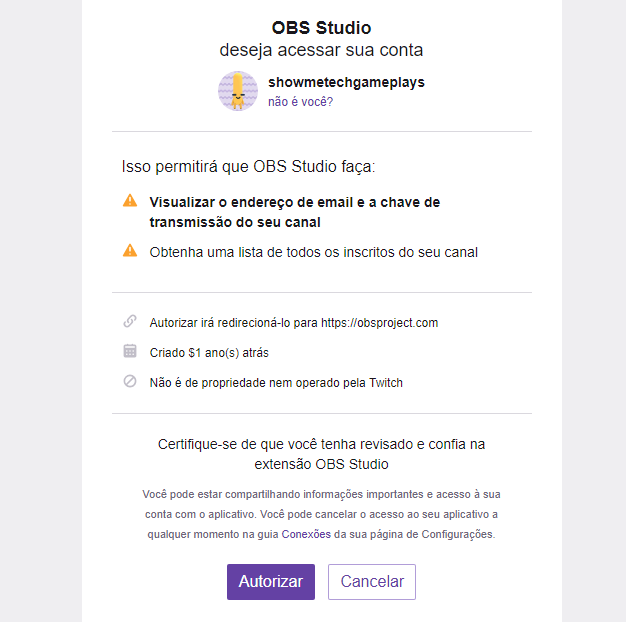
- Go to “settings”, in the “streaming” tab, select the streaming platform Twitch and click connect account;
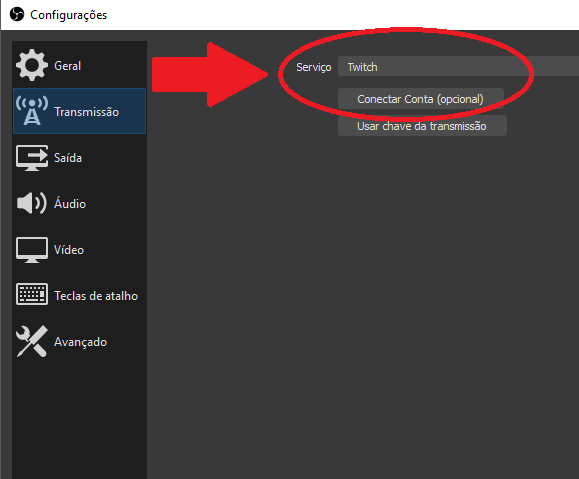
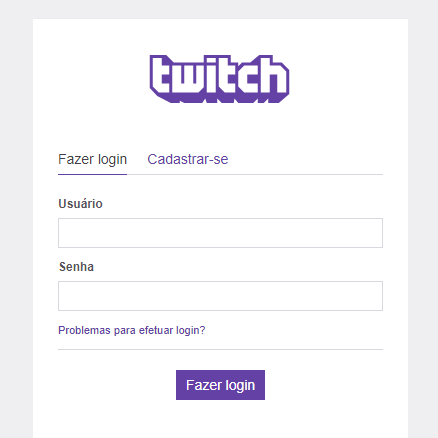
2. It will ask you to login to your account Twitch. Enter your credentials and authorize the OBS to use your account;
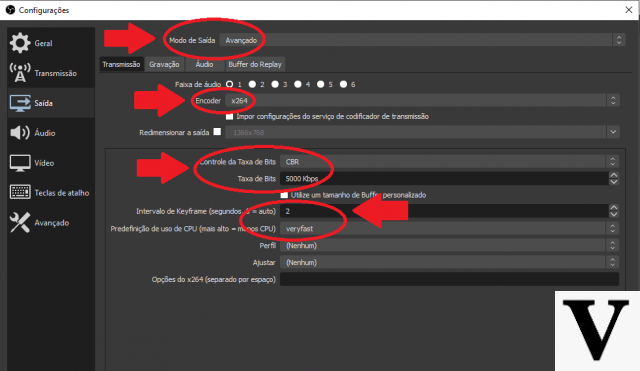
Now we need to configure the video output of your PC to Twitch. To do this, go to the “output” tab and click on output mode and change from simple guidance on advanced.
In the “encoder” part, you will select which component will render the images in the OBS. You usually have the option to choose x.264 (CPU) ou H.264 / NVENC (GPU). This varies greatly from your PC configuration, most of the time the CPU will render better than But by the full GPU acceleration tech, but if you don't have such a powerful processor, it will be better to put it to the But by the full GPU acceleration tech render, as it will produce less stuttering and lag. Remembering that putting to the But by the full GPU acceleration tech render, it can shorten the lifespan of your card.
After selecting the component that will render, you need to select the bit rate that OBS will reach. This directly influences the quality of your stream. Recommended for streaming to 720p and 30fps are 3000 kbps, that is, it will consume 3 MB upload of your internet. For 720p and 60fps the recommended are 4500 kbps. For resolutions above these, 6000kbps is the default for the highest image quality. Select the best option for your PC and internet upload speed.
In “keyframe range” put the value in 2 and preset usage of CPU at very fast, if your PC is more powerful. If not, you can put it in solid ou medium, as this also improves image quality.
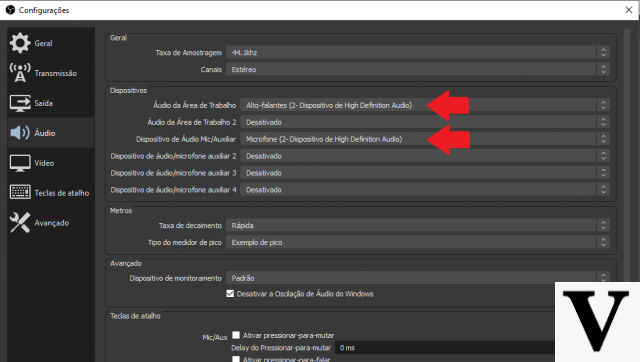
In the “audio” tab, go to desktop audio and select the PC's default audio output from the device list. For your mic, go to mic/auxiliary audio device and select the corresponding microphone from the list.
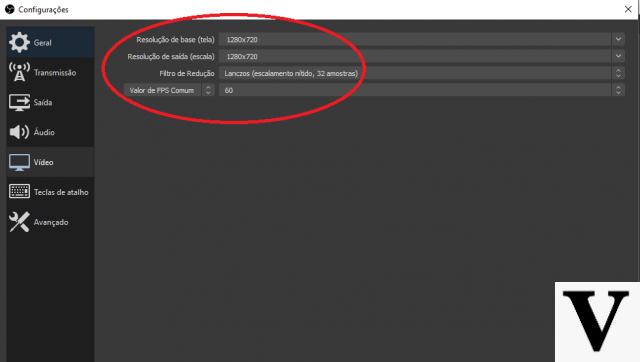
And finally, in the “video” tab, select the base resolution of your screen and the output resolution that will go to the Twitch - I recommend putting 1280 × 720. In a reduction filter, place in Lanczos 32 samples to improve image quality, and in common FPS value, select 30 ou 60 FPS, these values are linked to the bitrate selected in the transmission tab. Stay tuned.
Click “ok” to close the settings and save the changes made.
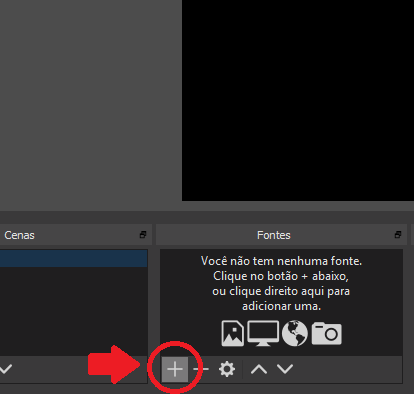
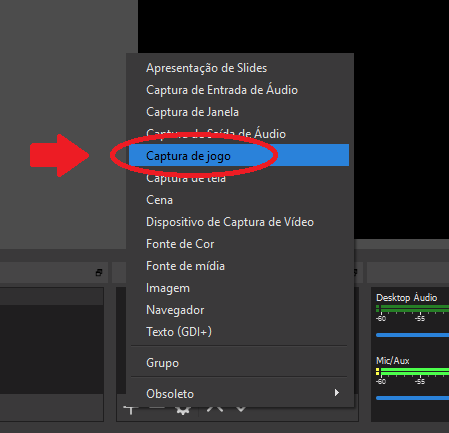
creating a scene
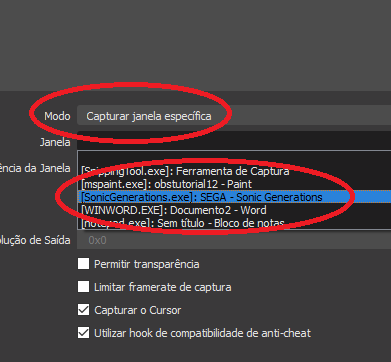
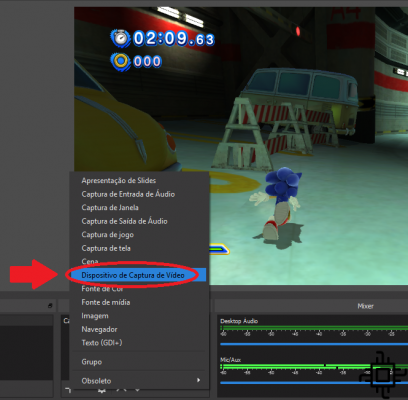
Now we need to create a scene to be broadcast to the Twitch, click on the symbol + under “sources” at the bottom and select game capture. Give your scene a name and in the next window, in the option way, select from the list the option capture specific window. just below, in “Window”, select the game window to be captured by the OBS – remembering that the game needs to be open to appear in the list.
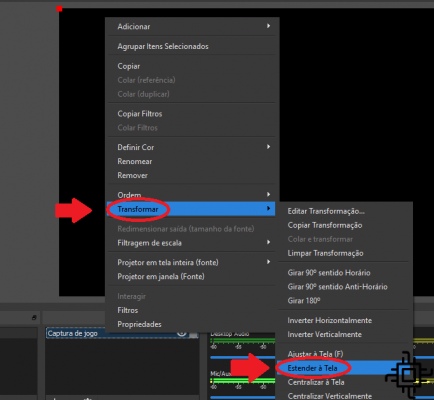
If, when selected, the game does not appear in the OBS, right-click on the created font, go to transform and select “extend screen”. If it still doesn't appear, delete the created scene and create a new scene. This time select capture window and select the game in window. If it still doesn't appear, do the same procedure by going to transform and clicking on extend the screen in this new scene.
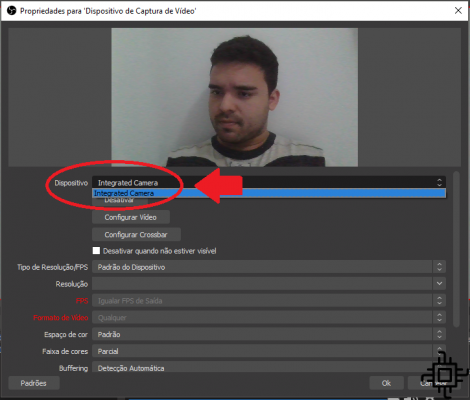
Now we need to add your webcam. Go to the “Fonts” tab, click on the symbol + and select video capture device. Select your webcam from the device list and press “ok”.
You can resize and place your camera anywhere in the scene. Put it where you prefer, but preferably, don't cover important details of the game you will broadcast.
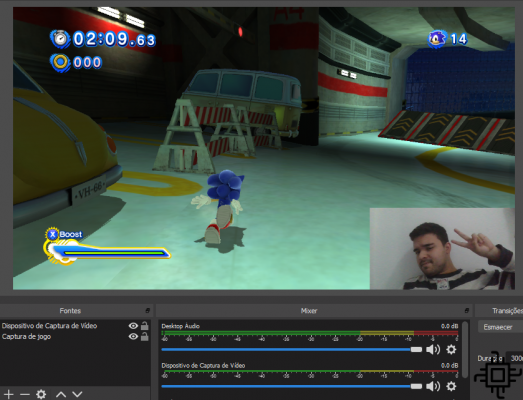
Ready. If everything is ok, click on start broadcasting and share your stream with all your friends. Remembering, you can control the volume of the game and your microphone in the bars at the bottom of the OBS.
Notes on the Twitch Service
A Twitch It doesn't release many features for newbies to the platform, it limits streams to the output resolution of your software and doesn't give your viewers the option to change the resolution. You cannot receive donations, bits or have paid subscribers to your channel until you become a affiliate. To become one, you need to stream regularly and have more than 100 followers on your channel. turning a affiliate, you will have many more options and can start to make money on twitch when streaming.
It is worth reiterating that, whenever you start a stream or change games during gameplay, update the game information in your Twitch. Always put the exact name of the game you are streaming. Forgetting to update or lying about the game currently being played is against platform policies and the Twitch may end up banning your account.
A Twitch also keep an eye on the content of your live. Drug apologies, drinking alcohol live, hate speech, nudity and religious intolerance are some of the ways to be easily banned from the platform.
Extra features for streamers
Professional streamers use various resources to stream and make it interactive and interesting for their viewers. One of these features is called chatbot, it's a little robot that stays in the chat Twitch and that the user pre-configures it to perform specific functions, such as greeting a new follower, telling you how long you've been playing, what games you've played, asking for songs to play on your stream, and much more. The most used bots are the PriestBot, NightBot and the Streamlabs Chatbot.
in own OBS you can create many different scenes to switch between during your stream. You can create scene to chat with viewers, have a waiting scene, scene with your channel logo, scene for X, Y, Z game. The possibilities are endless.
In addition, you can configure alerts to ring and appear on your stream when there is a follower, donation or subscription to your channel. There are several configuration tools for this widget, but the easiest to configure is the OBS Streamlabs. This is another broadcast software also owned by the developer of OBS, which brings some extra functionality.
Like Streamlabs it is a heavier software, we recommend that the full use of it be done in more powerful computers. If this is not the case, you can select only the widgets and place them in the Obs Studio.
In addition to these, there are many other entertainment features for your viewers. Once you get the hang of it and become that top-notch streamer, these features will make your stream shine even more.